
MAVLink Control Platform (MCP) – Beta User Guide
Release 0 – Beta. For testing and evaluation. Not for production use without completing your own validation.
What is MCP?
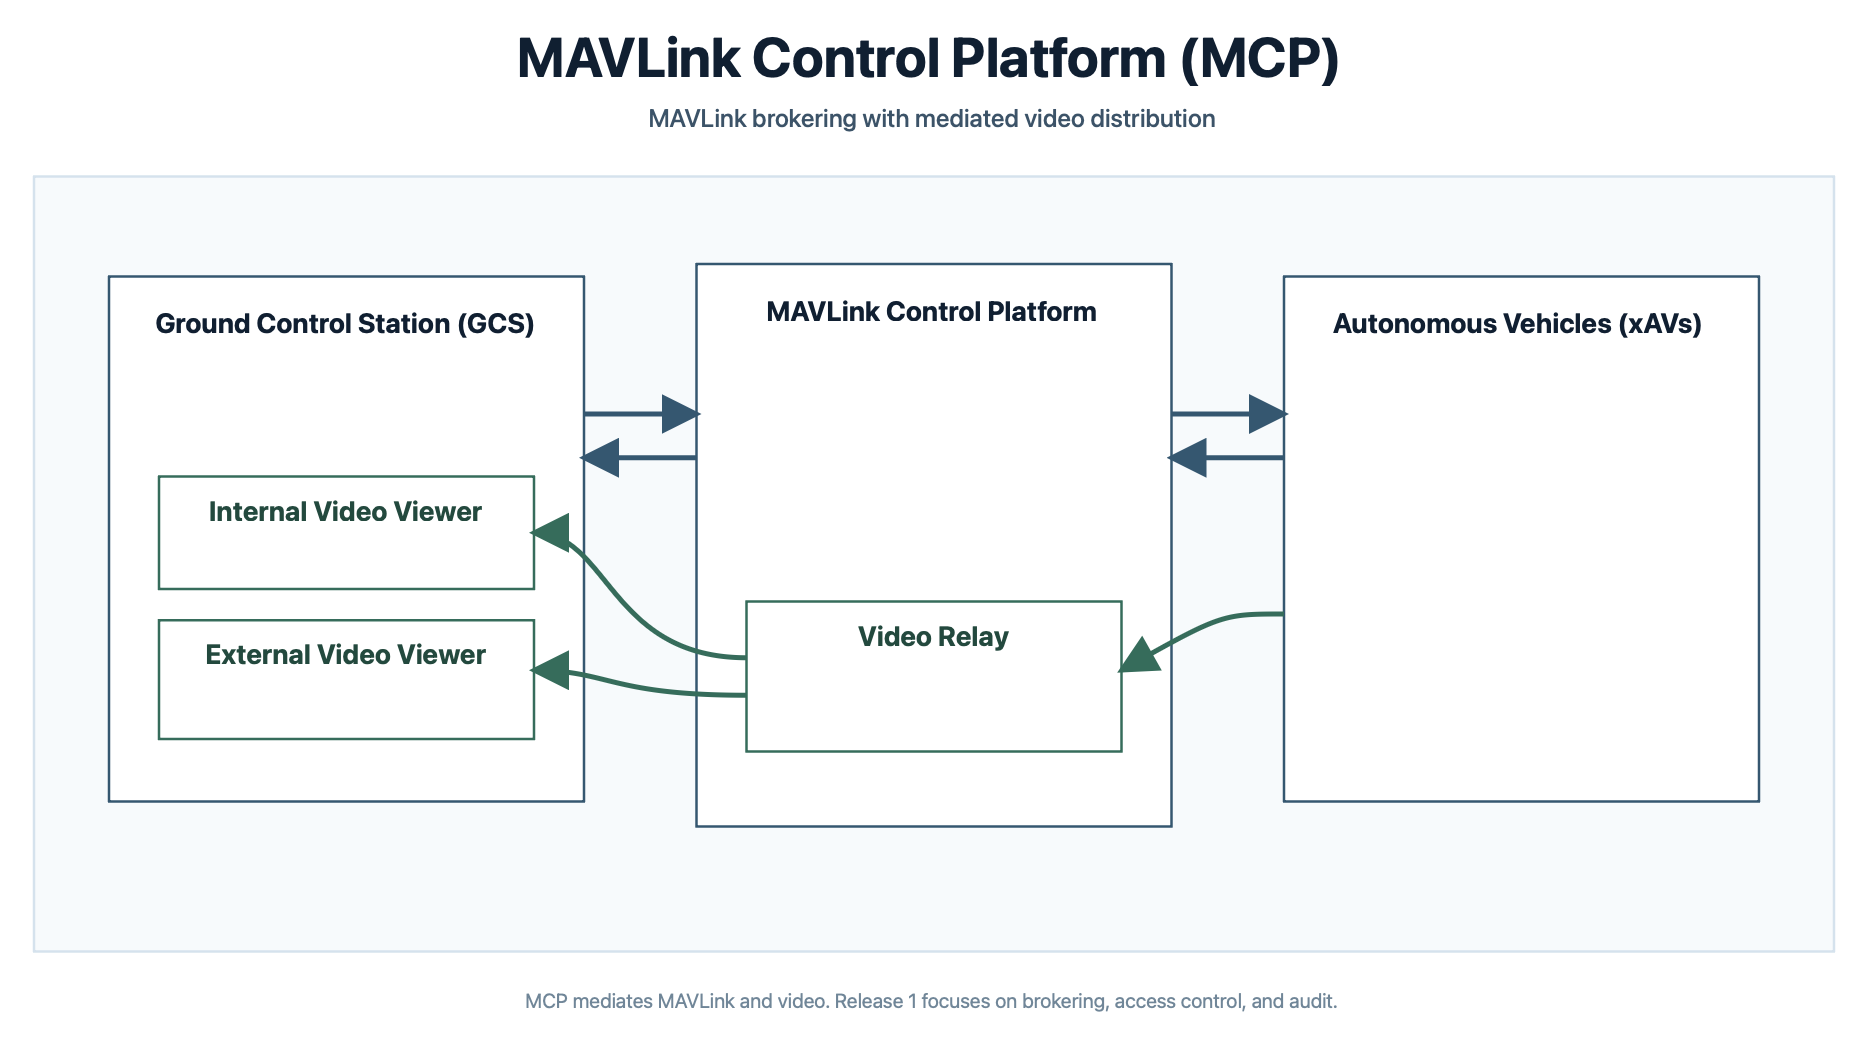
MAVLink Control Platform (MCP) adds a managed control layer to existing MAVLink communications. Instead of assuming implicit trust between peers, MCP routes command and telemetry through a central service that authenticates users, enforces policy, and logs activity. MAVLink remains the operational protocol, but its use is governed as a controlled service. This enables MAVLink-based systems to operate securely and at scale within regulated, multi-user, and networked environments without requiring fundamental changes to the existing MAVLink ecosystem.
MAVLink Control Platform is provided as a cloud broker that connects your ground control station (GCS) and vehicles over IP networks such as satellite, cellular/mobile networks or Wi-Fi. You get:
- Multi-tenant isolation – Your organisation’s data and vehicles are separate from other tenants.
- Web portal – One place to monitor vehicles, manage connectors and video, view geofences, and inspect the command audit.
- APIs – Automate setup and operations with REST APIs.
Visit https://melrosenetworks.com/products/mcp for more information on the MAVLink Control Platform from Melrose Networks.
Release 0 – Beta
This is Release 0 of MAVLink Control Platform and is a beta release. It is not a production release and is an early preview of the platform before its official release later in Q2 2026. You must carry out all necessary testing with MCP in your own environment before relying on it for live or operational use. Do not use the platform for live operations until you are satisfied that it meets your requirements and you have completed your own validation and testing.
Beta scope
- The beta is provided on a single EU-based platform instance. Other regions or locations may be available on request; contact Melrose Networks to discuss.
- Use of the beta is free of charge. The platform is expected to become chargeable at a later date; you will be notified of any future pricing and terms before they apply.
- Authentication and MAVLink message confidentiality are not provided.
For currently known issues with this beta, please see Beta - Known issues.
Getting access
- Request access – Go to https://eu-1.mcp-beta.melrosenetworks.com/portal and click Sign Up button. Use the signup flow on the platform: enter your company name, your name, and email, then request signup.
- Verify email – Check your inbox for a verification code and enter it on the verification page.
- Approval – Melrose Networks will review your request and approve or decline.
- Credentials – If approved, you receive an email with:
- Your tenant ID
- Admin username and password
- Portal URL and any API base URL
- Pre-configured setup – New tenant accounts include a pre-setup vehicle–GCS configuration so you can try the platform right away. Connection details (vehicle ID, GCS ID, connector info, and any URLs/ports) are included in the welcome email.
Keep these credentials and the welcome email secure. Use them to log in to the portal and to call tenant APIs.
Logging in to the portal
- Open the portal URL (e.g.
https://eu-1.mcp-beta.melrosenetworks.com/portal). - Enter your username and password.
- After login you’ll see the main tabs: Manage, Monitoring, Geofences, Users, and Audit.
Portal areas
Manage
- Vehicles – Add and configure vehicles (IDs, optional RTSP/video settings). Vehicles must exist before you can connect a GCS or run connectors.
- GCS – Register ground control station IDs that are allowed to talk to your vehicles.
- Connectors – Define and control vehicle and GCS connectors that bridge local MAVLink (UDP or TCP for GCS) to the platform. You can Start / Stop connectors and see their status.
Use this tab to create vehicles and GCS entries, then create and start the right connectors so your GCS and vehicle can communicate through MCP.
Monitoring
- View vehicles and connectors and their status (e.g. connected, last activity).
- Live video – If a vehicle has UDP video relay configured and the relay is started, you can open the vehicle in Monitoring and use Show video to view the stream in the browser (WebRTC).
Use Monitoring to confirm that vehicles and connectors are up and to watch live video when configured.
Geofences
- Platform – Read-only view of platform-level prohibited areas (e.g. country boundaries, airports, critical infrastructure). These apply to all tenants.
- Tenant – Prohibited and allowed areas defined for your tenant.
- Vehicle – Per-vehicle geofence policies (e.g. allowed zones, deny-takeoff zones).
- Prohibited area approach webhook (tenant admins) – Enable a webhook and set:
- URL – Your HTTPS endpoint.
- Warning time (seconds) – How many seconds before predicted entry into a prohibited area to send the webhook.
- Cooldown (seconds) – Minimum time between webhooks per vehicle.
When a vehicle is on a trajectory to enter a prohibited area, the platform sends a POST to your URL with event details (vehicle, tenant, ETA, position, etc.). Use this for alerts or automation.
Users
- Tenant admins can invite users and assign roles: admin, operator, or viewer, and optionally restrict access by allowed vehicles or allowed GCS.
- View and manage who has access to your tenant.
Audit
- MAVLink audit – View commands sent from a GCS to a vehicle. Select vehicle and GCS, then Refresh to load messages from the last 24 hours. Use this for compliance and troubleshooting.
Quick start (new tenants)
Your account is created with a pre-setup vehicle–GCS configuration. The welcome email contains the details (vehicle ID, GCS ID, connector settings, and IPs/ports). Use those to connect your GCS and vehicle through the platform without creating resources manually. For more vehicles or GCS, use the Manage tab as described in Typical workflow below.
Before live use: This is a beta release (Release 0). Perform all necessary testing with MCP in your environment before using it for live or operational missions.
Typical workflow: connect a GCS and vehicle
New tenants: Your welcome email includes a pre-setup vehicle–GCS configuration and connection details. You can use that to connect immediately, or follow the steps below to add more vehicles and GCS.
- Manage → Vehicles – Ensure the vehicle exists (e.g.
veh-001). - Manage → GCS – Ensure the GCS is registered (e.g.
gcs-001). - Manage → Connectors – Add a vehicle connector (points to this vehicle and your tenant). Start it. If you use passthrough, the connector binds a local UDP port; point your vehicle or SITL at that host/port.
- Manage → Connectors – Add a GCS connector (same vehicle, your GCS ID, and optionally local port and GCS host/port). Start it. Point your GCS (e.g. QGroundControl) at the connector’s local port (UDP or TCP on the same port) or the instructed address.
- Monitoring – Confirm the vehicle and connectors show as connected and active.
- (Optional) Video – If the vehicle has UDP video relay configured, start the relay (via Manage/connectors or the video API). Then in Monitoring, select the vehicle and use Show video to view the stream in the portal.
Your GCS and vehicle now communicate via MCP with tenant isolation and audit.
Pre-setup vehicle-GCS configuration: You may need to enable the connectors if they have red indicators. To do so, click on each connector and the indicators will turn green to indicate enabled.
Using the APIs
- Tenant APIs – Use your tenant ID and API key (from the approval email or your tenant admin). Send them in headers, for example:
x-tenant: <tenant_id>,x-api-key: <api_key>. - Endpoints – Typical operations: list/create/update vehicles, list/create GCS, list/create/start/stop connectors, start/stop video relay, get audit data. Base URL is the same host as the portal (e.g.
https://your-mcp-host). - API reference – Use the OpenAPI/Postman assets provided with the platform (e.g. in the portal assets or from your administrator) for exact paths, request bodies, and responses.
Use the APIs to automate fleet and connector setup, video relay control, and audit retrieval.
Roles and permissions
- Viewer – Can view Monitor, Geofences (no edit), and Audit within their allowed vehicles/GCS.
- Operator – Can use Manage (connectors, vehicles, GCS) and start/stop video within their allowed scope; cannot manage users or geofence webhook config.
- Admin – Full tenant control: users, geofence webhook, and all operator capabilities.
Your capabilities depend on your role and any vehicle/GCS restrictions set by your tenant admin.
Geofence behaviour
- Prohibited areas – The platform can block GCS→vehicle commands when the vehicle is inside a prohibited area (platform or tenant/vehicle config). Deny-takeoff zones prevent arming in those areas.
- Approach webhook – Fires when the vehicle is in motion and predicted to enter a prohibited area within the configured warning time; cooldown limits how often you get notified per vehicle.
Configure prohibited/allowed areas and the webhook in the Geofences tab (tenant admins for webhook and tenant/vehicle geofences).
Getting help and reporting issues
- Documentation – This guide plus any tenant-specific instructions from your administrator.
- API reference – OpenAPI/Postman collection provided with the platform.
- Issues and feedback – Contact the Support Team at Melrose Networks ([email protected]) for beta feedback, bug reports, and feature requests.
Documentation and API reference can be found by clicking on the Help button in the portal.
Disclaimer
This software and documentation are provided for use in connection with the MAVLink Control Platform beta programme. Melrose Networks (Melrose Labs Ltd) gives no representation or warranty (express or implied) as to the accuracy, reliability, availability, security, fitness for purpose, or non-infringement of the platform, and accepts no liability for any loss or damage (direct, indirect, or consequential) arising from or in connection with your use of or reliance on the beta platform, the documentation, or any related materials. You use the beta at your own risk. The platform is provided “as is”. You are solely responsible for ensuring that your use of MCP (including any testing and any decision to use it for live or operational purposes) complies with all applicable laws and regulations and with your own policies and risk tolerance. Nothing in this documentation or in the beta programme shall create any contractual obligation on Melrose Networks beyond the terms (if any) that you have agreed with Melrose Networks in writing for participation in the beta.
MAVLink Control Platform – Beta. Melrose Networks.